Subscribe to Follow this Blog

If you like what you see, please subscribe to follow along either in a Reader or by email!

Saturday, January 28, 2012

The Path to Our Dream Home: Media Closet

Today we continue the Path to Our Dream Home series with a less visually appealing space that is super-high function - the Media Closet.  To catch up, you can visit Back to the Beginning, the Main Bath, the Guest Bath and the Utility/Storage Room.  Each post tours the room in photographs, and shows how we work a lot of organization and function into each room of our small house.  There are many project ideas for each room, so none of them is ever "done", but they are all on the path to our dream home!

Among my husband's proudest achievements, we turned a hallway linen closet into the ultimate Media Closet.  Our linens are stowed under the bed in the master bedroom, which freed up this small closet to house the following components:

Home Theater:
Media Center PC
7.1 Surround Sound Receiver

Computer Networking and Communications:
ASUS Wireless Router
Motorola Cable Modem
AT&T MicroCell mini cell phone tower (otherwise our cell phones have no signal at home)
USB Printer

Media Center PC

We are movie and music lovers and have tons of both, along with a bazillion pictures.  We store all of our media on a dedicated computer we have named "Mediatron".  Because it has three hard drives in it, totaling 3.5 terabytes of space, I can procrastinate with the digital clutter project just a little bit longer, but the blog is a great excuse to tackle the digital clutter (more soon)!  ;)  The hard drives also have back-ups in place for the media, as well as for the laptops in the "office" (in the living room).

The Media Closet is conveniently located about 4 feet behind the wall in the living room on which the TV hangs (picture of the view from the living room is below).  When the house was re-wired during our renovations, special wiring and outlets were installed to minimize cables from view. Through the walls and the attic the HDMI cables and speaker wires run between the Home Theater receiver and the TV and speakers, respectively.  Mediatron and the Cable box are both routed through the receiver to the TV.  Within the closet, Mediatron is wired to the router for speed, and the semi-old printer is wired to the router as well, allowing us to print wirelessly from the laptops in our office. The bulky subwoofer lives in the attic and trust me when I tell you that it works just as well up there, and we love not having to sacrifice space for it or look at it!

We use the Windows 7 libraries to organize the movies, music, pictures and videos on the computer.  Then Windows Media Center is the player for all the media we own, both in the living room, and via Media Center Extender and the XBox 360 that is connected to our bedroom TV.  We can also watch TV shows and listen to music online in the living room.  If anyone is interested in more details about our set-up (how Mediatron was built to "scream", back-ups, codecs, add-ins, etc), I will ask my husband to do a guest post on the subject, because we've reached the limit of my understanding!


One Remote to Rule Them All

An IR repeater connects all the components that are controlled by a remote to the receiver, so that all that shows in the living room is the tiny box way up high on the wall, that has a blue light to show that the signal is received from the remote.


My husband programmed the receiver's remote to control the TV, Cable Box, the receiver, and even Windows Media Center on the computer!  We also have a wireless keyboard and mouse that make the computer fully functional.  All the devices are hidden behind the closet door!  It is awesome!!

Proper Ventilation

We installed a bathroom fan and light combo into the ceiling of this tiny closet to give it adequate ventilation with the door closed.  The fan runs at 2.5 sones and you can't hear it at all in the living room with the closet door closed, even with the TV off.  It makes a HUGE difference in terms of the temperature inside the closet, and with the computer working less hard to keep itself cool, I'm sure it works faster and uses less energy!

Paper Storage

After all the functionality of the top few shelves of this closet, I am so excited that there was just enough space leftover for some extra storage.  Along with the camera and accessories, printer paper is stored in black boxes below the printer - white paper on top and specialty papers for printing photos, resumes, etc. below.  On the floor, I put my Iris Scrapbook storage tower, which I use to organize all my craft paper.  The tower holds six clear storage boxes perfectly sized for 12x12 paper.  Each box can slide out and travel to my desk for crafts. 


How do you organize your media?

This post is linked up to the following link parties:

Sundae Scoop @ I {Heart} Naptime

Weekend Warrior Link Party @ Ask Anna

Metamorphosis Monday @ Between Naps on the Porch

One Project at a Time @ A Bowl Full of Lemons

Inspiration Board @ Homework

Overflowing with Creativity @ It's Overflowing

Show & Tell @ Blue Cricket Design

Home Decor and Organizing Link Party @ organize & decorate everything

Delightfully Inspiring Thursday Party @ Delightful Order

Crafty Scrappy Happy Me. Thursday

Hooking up with HoH @ House of Hepworths

Potpourri Friday @ 2805

Sunday, January 15, 2012

The Path to Our Dream Home: Utility (and More) Room

Today I continue the Path to our Dream Home series with the utility room.  If you are just joining me, click the links to go Back to the Beginning, see the Main Bath Transformation, or see the Guest Bath Transformation.

Where once a rickety platform and small set of stairs connected the house and the garage, we built a utility room that in many ways is the most important room in the house.  I have often said this room is what makes the small square footage of our home and limited storage space inside manageable, and I will show you why.  We started with this (double ack!):

We robbed the large two-car garage of a little more space than the old platform occupied to frame in a 12 ft x 8 ft room with a more substantial set of stairs. 

We moved the washer and dryer plumbing from the hallway just inside the house to the new utility room (to expand our Guest Bathroom) and replaced the hot water heater with a tankless version mounted above the dryer. 

We love the tankless water heater.  One of the best features is the ability to select the hot water temperature.  I can wash cloth diapers with 140 degree water and switch the temperature to 104 degrees for the kids' baths.  We also make the most of vertical space by hanging the iron, mops and sweeper vacuum, as well as the clean laundry basket up on the wall.

Along the other side of the room, we installed pre-fabricated utility room cabinets, an upright deep freezer, and a few more shelves for storage.  There is just enough room between the back wall and the large cabinet to store the leaf to my dining room table and the ironing board, along with my large roasting pan hanging on the wall above them.


In the couple of inches between the side of the freezer and the cabinets, I keep a folding table and large art paper.  I use the cabinets, as well as baskets on shelving above the large cabinet, to store pantry items, small appliances, household items and cleaning supplies.   I keep small items like makeup, and pet supplies in clear storage containers at the front of the deep cabinet.  I keep rarely used serving pitchers behind the clear containers and use labels right on the shelf to remind me that they are out of sight in the back.  

I also use labels on the shelves to organize the canned goods and make inventory a breeze.

The open shelves house games, puzzles and craft supplies that need supervision for the kids to use.  I use clear shoe boxes and inexpensive (but super cute) caddies to organize the kids' craft supplies.


With all the things that are stored in this room, including the items in the junk drawer that I organized (in 30 minutes!) for a recent post, this room is a significant part of my home organization strategy.  

What do you find is the most useful room in your home to keep your life and home organized?

This post has been linked to: 

Fantastic Organizing Links at I'm an Organizing Junkie 

Weekend Bloggy Reading - Serenity Now
Inspiration Friday - At the Picket Fence


Potpourri Friday - 2805
Flaunt it Friday - Chic on a Shoestring Decorating


Transformation Thursday - The Shabby Creek Cottage

Crafty Scrappy Happy me.
Hookin' Up with House of Hepworths

Delightfully Inspiring Thursday - Delightful Order


The Creative Spark - Clean & Scentsible


Home Decor & Organizing - organize & decorate everything
Whatever Goes - Someday Crafts

Overflowing with Creativity - It's Overflowing

Show & Tell - Blue Cricket Design

One Project at a Time - A Bowl Full of Lemons
Inspiration Board - Homework

Metamorphosis Monday - Between Naps on the Porch

Friday, January 13, 2012

Family Communication Center {Getting Started}

I've made some progress on putting together a family communication center. Here's where I am at today:

I've been wanting to put together a family communication center for awhile now.   I dream of a mudroom with coats and purses and shoes and this communication center.  I comb the blog-world and Pinterest for ideas, and see lots of amazing things.

{Source via Pinterest}

But the truth is that I just plain don't have the space!  I love the look of the center pictured below from The Yellow Cape Cod, and I have been dreaming of an application for chalkboard paint, but my husband doesn't like the idea of the chalkboard dust in the house (which I totally understand).  And my kids are too little to have the center be within their reach, so it'll be confined to a higher part of the wall.  I do like the ledge with pictures, and I may be able to pull that off!

{Source}
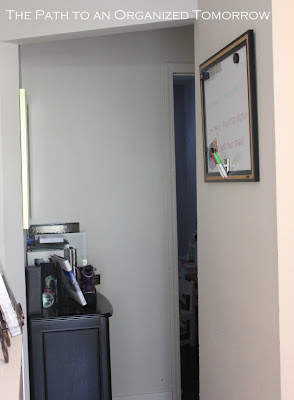
I have a wall that is only 34 inches wide to devote to this.  Its location makes sense as you come in the house from the garage.  It is in a narrow hallway, so I can't incorporate anything that sticks out too much.


I found the white board with cork board incorporated into its frame at Target and it was the perfect size for this little wall.  I love it!  We started with just this hanging on the wall by itself and lived with that for awhile to see what else was missing.  With projects like this, where function is so important, I find that small increments are key.  Many of our ideas evolve so much that it is impossible to plan a project to its finish before implementing it (and end up with something that truly works).

A main component of our family communication center is a calendar.  This had been on the fridge, but it is a logical addition to the new area (and I'm trying to de-clutter the fridge this year!).  We use this calendar to mark upcoming events, and record both important milestones (Zoe's first tooth!) and mundane activities (when the dog got his Heartworm medication last).  And for 2012, I am SOOO excited to put on display and use our Christmas present from my 3-year old (she made it at preschool for us and it was wrapped up under the tree - AWWW!).  It is truly a masterpiece and a treasure!


So what to do next?

I'd like to incorporate better (and pretty!) storage for the dry erase pens and pencil for the calendar.  I stick with pencil for all my hand-written calendars, and I won't keep any non-dry erase pens in this area because that's just an accident waiting to happen.

I'd like to make the area more visually appealing.  A ledge with some pictures and/or decorative items would help.  Perhaps some cute hooks for keys and maybe a place for the husband's wallet (so it can stay with his keys).  I have lots of other ideas (like adding in an electrical outlet and incorporating a charging station!) but I think this area is just too small.  I'll keep you posted!  And I welcome any ideas!!

How do you organize your family's communication?

This post has been linked to:
One Project at a Time - A Bowl Full of Lemons

Monday, January 9, 2012

The Path to Our Dream Home - Guest Bathroom

This post continues the series on the Path to Our Dream Home (for a recap, go back to the beginning).  Our second bathroom started as a super tiny half bathroom like this (ack!):


We moved the laundry from behind the wall with the toilet and sink into a new utility room in the garage, which allowed us to expand the size of this bathroom by just enough to squeeze in a small shower.  Needless to say, we reconfigured the plumbing in this room to accommodate the new size and layout.  Here is the result:
I find it difficult to get great pictures of this tiny space!  The window looks out under our covered patio, so it never gets great natural light, and the fact that it is mostly corners results in a lot of shadows.  Please forgive the quality of the pictures!  And if anyone has any tips on photographing spaces like this, I welcome them in the comments!  

My Favorite Features

In addition to the white tiles for this room, we bought a small number of black tiles without deciding exactly how to incorporate the contrast into the room.  We ended up distributing black tiles randomly throughout the room, and creating a strip of black triangles or white diamonds, depending on how you look at it, in the shower.  I love how it turned out!  

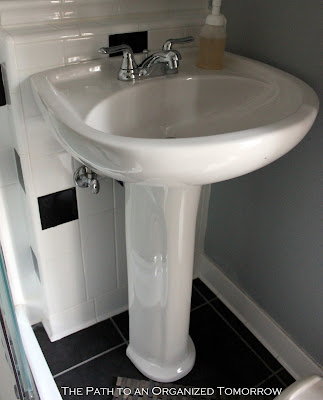
The pedestal sink is a major step up from the tiny wall-mounted sink that was in this room before.  It works well in this small space (even the smallest vanity wouldn't fit!) and looks great! 

A common theme in the whole house, the neutrality of the permanent fixtures of the room allows us to change the look of the room any time.  I absolutely love the accessories in there right now!

A second shower in the house - this bathroom runs so short on space, we could have easily expanded it to a generous half bathroom and skipped the shower.  But we have no regrets!  Even though we don't use it as our primary shower, it is very nice to have for guests, and since this bathroom is right off of a back door, it provides a great place to clean up after heavy yard work.


I really like the elements that are in this room, but I would like to introduce more color.  How would you incorporate color into this room?

This post has been linked to the following link parties:
Crafty Scrappy Happy me.
 
The Creative Spark - Clean & Scentsible

Potpourri Friday - 2805
Inspiration Friday - At The Picket Fence

Flaunt It Friday - Chic on a Shoestring Decorating

Hookin' Up with House of Hepworths
Delightfully Inspiring Thursday - Delightful Order
Transformation Thursday - Shabby Creek Cottage

One Project at a Time - Bowl Full of Lemons


It's Overflowing - Overflowing with Creativity
Homework - The Inspiration Board


Thursday, January 5, 2012

How to Organize Your Junk Drawer (in 30 Minutes!)

My junk drawer needed some attention recently, which tends to happen every year or so...  I purchased some containers to organize the various random things that live in the junk drawer and when I went to organize the drawer, I timed myself.  I figured if it took me an hour, I could title the post as such.  But it only took me 30 minutes!!
 

How to Organize Your Junk Drawer in 30 Minutes

I started with this:


And I had already purchased the drawer organizing set pictured below.  Don't forget to measure the drawer before you purchase organizers so they will be sure to fit!  The organizers were a step up for this drawer - I used to keep everything in this drawer separated with baggies, which totally worked, but didn't look quite as nice...
Source: Target
It is important to have an idea of what you'd like to have in the "junk drawer", which seems to be so named because it holds random stuff that doesn't obviously go together, but doesn't really go anywhere else in particular.  

For me, the main purpose of the junk drawer is to house the batteries as well as a couple of tools and basic hardware (nails and picture hooks) I like to have at-the-ready without having to go to the husband's garage.  I like to keep the batteries well organized so I can easily get an inventory of what I might need to purchase rather than run out of a particular size.

I took each item out of the drawer and decided what to do with it. I sorted all of the items on the surface of my washer and dryer.


I had too much stuff in the junk drawer, since that is the go-to spot for things with which I'm not sure what to do.  Items that really belonged in the garage made their way into a basket destined for the garage.  Hardware that had been in its original packaging went into some magnetic tins I no longer use for embellishments.  It is amazing how much space packaging takes up! 

I also corralled all the twist-ties and bread clips in one spot here to be re-used (and no longer sitting on my kitchen window sill).  As an aside, I now save the bread clips for use with all my rolls of tape.  isn't this a great idea?  Love pinterest!!


Source: Pinterest
I played with the placement of the items in the mesh organizers until I had an arrangement I liked.  Then I put the organizers in the drawer, redistributed the things that hadn't belonged in the drawer, and took out the trash/recycling. 

And voila!  An organized junk drawer in 30 minutes!


What do you keep in your junk drawer?  How do you organize it?

 This post has been linked to the following link parties:
One Project at a Time - A Bowl Full of Lemons
Related Posts Plugin for WordPress, Blogger...